When to Consider a Walking Cane
A cane is not an admission that something is wrong. It is a tool that extends your stability, just like reading glasses extend your vision. The right time to start using one is before you actually need it urgently, not after a fall forces the decision.
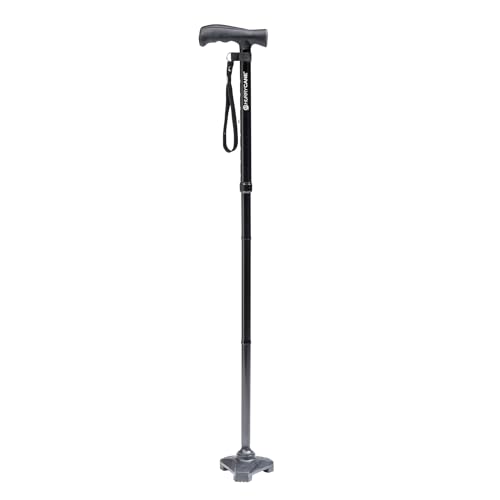
HurryCane Freedom Edition Foldable Walking Cane with T Handle
Patented SteadiGrip three-point pivoting base adapts to uneven terrain like an ankle, providing superior stability on any surface.
Check Price on AmazonThere are clear signals that a cane would help. You instinctively reach for walls or furniture when walking through the house. You feel unsteady on uneven ground like grass, gravel, or cracked sidewalks. You have started avoiding outings because you are worried about tripping. You notice that one leg feels weaker than the other after a knee replacement, hip surgery, or a bout of sciatica. Any of these situations means a cane could make a meaningful difference in both safety and confidence.
Doctors and physical therapists often recommend canes after specific events: a fall, a surgery, a diagnosis of peripheral neuropathy, or a noticeable change in balance during a routine visit. But you do not need a prescription to use a cane. If you feel less stable than you used to, a cane is a reasonable response.
Types of Walking Canes
Not all canes are the same, and the differences matter. Choosing the wrong type can make walking harder rather than easier. Here are the main categories and who each one suits best.
Standard Single-Point Canes
The classic design: a straight shaft with a single rubber tip at the bottom and a handle at the top. These are lightweight, simple, and work well for people who need mild balance assistance but still have decent overall strength and stability. Standard canes are the least expensive option, starting around $10 to $20.
The limitation is stability. A single contact point on the ground means the cane can tip over when you set it down, and it provides minimal support on uneven surfaces. If you feel significantly unsteady, a single-point cane may not provide enough support.
Offset Canes
An offset cane has a shaft that angles slightly before connecting to the handle. This design positions your hand directly over the tip rather than behind it, which distributes your weight more efficiently through the cane. Offset canes provide better support than straight canes for the same effort. They are the most commonly recommended type for general use and cost $15 to $30.
If you are choosing your first cane and have moderate balance concerns, an offset cane is usually the best starting point.
Folding Canes
Folding canes collapse into three or four sections, connected by internal elastic cord. They fold down to 10 to 14 inches and fit in a bag, suitcase, or glove compartment. This makes them ideal for travel, dining out, and situations where you do not want to carry a full-length cane the entire time.
The trade-off is that the folding joints create slight flex points in the shaft. This is imperceptible during normal use, but users who have tried both folding and solid canes may notice the difference. Some folding canes, like those with pivoting bases, add extra stability features to compensate.
Quad Canes (Four-Point Base)
A quad cane has a flat base with four rubber feet instead of a single tip. The wider base provides significantly more stability and allows the cane to stand upright on its own. Quad canes are recommended for people recovering from stroke, those with significant weakness on one side, or anyone who needs maximum support from a cane.
Quad canes are heavier (typically 2 to 3 pounds) and the base can feel awkward on stairs or in tight spaces. They come in two sizes: a small-base quad that is less obtrusive and a large-base quad that offers the most stability. Prices range from $25 to $60.
Seat Canes
A seat cane is a standard cane that unfolds into a small stool. These are designed for people who need to rest frequently during walks, outings, or while standing in lines. They are heavier and bulkier than regular canes, but they solve a real problem for anyone whose endurance is limited.
Seat canes have lower weight limits than standard canes (often 220 to 250 pounds) and require a flat surface to deploy. They are not a replacement for a regular cane for walking support, but rather a companion for situations where seating may not be available.
Handle Types and Hand Comfort
The handle is the part of the cane you touch every time you use it. Getting the right handle matters for comfort, especially with arthritis or hand weakness.
T-Handle (Fritz Handle)
The most common style. A horizontal bar at the top of the shaft that you grip by wrapping your hand over the top. This distributes weight across the palm. T-handles are comfortable for extended use and provide good control. They work well for most people and are the default recommendation.
Crook Handle
The classic curved handle that hooks over the forearm or a chair back. Crook handles look traditional and are easy to hang, but they concentrate pressure on the base of the palm, which can cause discomfort during longer walks. They provide less control than T-handles for people with weak grip.
Ergonomic (Palm Grip) Handle
Shaped to match the natural curve of the hand. These handles spread pressure evenly and reduce stress on the wrist and fingers. They are the best option for arthritis. Ergonomic handles are typically right-hand or left-hand specific, so make sure you order the correct side. They cost slightly more than standard handles.
Foam and Gel-Padded Handles
Any handle type can be upgraded with foam or gel padding. This is worth doing if you use the cane for extended periods or if you have sensitive skin on your palms. Replacement grip covers are available for under $10 and slide over the existing handle.
How to Fit a Cane Properly
An improperly sized cane causes more problems than it solves. A cane that is too tall forces you to hike your shoulder up, leading to neck and shoulder pain. A cane that is too short makes you lean to one side, stressing your back and actually increasing fall risk.
The Standing Test
Stand in your normal walking shoes on a flat surface. Let your arms hang naturally at your sides. The top of the cane handle should align with the crease of your wrist. When you grip the handle, your elbow should bend at approximately 15 to 20 degrees. This angle is important because it allows your arm to bear weight efficiently without muscle fatigue.
Adjustable vs. Fixed-Length
Adjustable canes use a push-button pin system to set the height. They are the best choice for most people because you can fine-tune the fit and readjust if your posture or footwear changes. Fixed-length canes (usually wooden) can be cut to size, but once shortened they cannot be lengthened. Adjustable canes are the practical choice unless you strongly prefer the aesthetics of a wooden cane.
Professional Fitting
If you have a complex condition (post-stroke weakness, significant spinal curvature, leg-length discrepancy), have a physical therapist fit your cane. They will assess your gait, strength, and balance to recommend the right type, height, and technique for your specific situation.
Proper Walking Technique
Using a cane incorrectly is surprisingly common and reduces its effectiveness. The single most important rule: hold the cane on the opposite side of the body from the weaker or painful leg.
This feels counterintuitive to most people. If your right knee hurts, you instinctively want to hold the cane in your right hand. But holding it in the left hand is biomechanically correct. When you step forward with the right (painful) leg, the cane in the left hand moves forward simultaneously, creating a wider base of support and reducing the load on the right leg. This is how physical therapists teach cane use, and it makes a significant difference in both stability and pain reduction.
The Step Sequence
Move the cane forward with the weaker leg simultaneously, then follow with the stronger leg. The cane and the weaker leg land at the same time, share the load, and the stronger leg follows. On stairs, remember the rule: the good leg goes up first, the bad leg goes down first. (“Up with the good, down with the bad.”) The cane always moves with the weaker leg.
Common Mistakes
Placing the cane too far forward (more than one step ahead) creates instability. Planting the cane to the side rather than slightly in front creates an awkward gait. Gripping too tightly causes hand fatigue. And the most common mistake of all: putting the cane on the wrong side. If a cane feels unhelpful, switching it to the opposite hand often solves the problem immediately.
Cane vs. Walker: When to Upgrade
A cane provides balance assistance and mild weight support. A walker provides a full frame to lean on with both hands. The transition from cane to walker is appropriate when a cane is no longer enough to keep you feeling steady.
Signs you may need a walker instead of a cane: You lean heavily on the cane to support your weight. You feel unstable even with the cane on rough surfaces. You have weakness or pain on both sides of the body (a cane only helps one side). You have had falls while using the cane. A rollator (walker with wheels and a seat) is often the next step for people who need more support but want to maintain walking speed and distance.
There is no shame in transitioning from a cane to a walker. The goal is safe, confident mobility, and the right tool changes as your body changes.
Accessories Worth Considering
A few inexpensive accessories can make a cane significantly more useful.
Wrist strap: Attaches to the handle and loops around your wrist. Prevents the cane from falling when you need both hands briefly (opening a door, carrying a bag). Costs under $5.
Ice tip attachment: A flip-down metal spike that provides traction on ice and snow. Essential for anyone who walks outdoors in winter. Costs $10 to $15 and attaches over the existing rubber tip.
Cane holder/clip: Mounts on a table edge, desk, or counter to hold the cane upright when sitting. Solves the constant problem of the cane falling over when leaned against furniture. Costs $5 to $10.
Replacement rubber tips: The rubber tip wears down over time and should be replaced when the tread is worn smooth. Check the tip monthly and replace it when it looks flat or cracked. Standard tips cost about $3 and are available at any pharmacy. If your cane uses a proprietary tip (like a pivoting base), order replacements online before you need them.
Making the Decision
Choosing a cane is not complicated once you understand the basics. For most seniors who need mild to moderate balance support, an adjustable offset cane or a folding cane with a stable base is the right choice. Fit it properly to your height. Hold it on the opposite side of the weaker leg. Use it consistently, not just on bad days.
If you are an adult child helping a parent choose a cane, involve them in the decision. Let them hold different handle types and see what feels comfortable. A cane that stays in the closet because it hurts the hand or feels awkward is not helping anyone. The best cane is the one that gets used every day.